How to Start an AppRobotic AWS Marketplace Virtual Machine?
Quick Overview in 5 Steps
- Subscribe to AppRobotic on the AWS Marketplace (https://aws.amazon.com/marketplace/pp/B00WZTUCPW) page.
- Launch an AppRobotic EC2 Instance via 1-Click Launch or EC2 Console. We recommend limiting allowed inbound IP addresses for RDP ports to your organization’s IP range by creating a custom security group and selecting it on the Firewall Settings page.
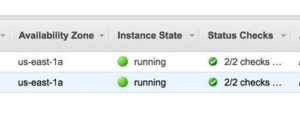
- Once the Instance Status shows “running”, “Get Windows Password” using the key pair you selected or created while launching this Instance:
- Connect to your AppRobotic virtual machine with an RDP app such as Remote Desktop Connection from Windows/Mac, or rdesktop from Linux. Use the “IPv4 Public IP” shown in EC2 for this Instance. Use the default Username “Administrator”, and the Password retrieved during Step 3 and click “Connect”:

- Once the virtual machine desktop opens, double-click the AppRobotic icon on the desktop to launch AppRobotic Designer. There is also a Getting Started script on the desktop, simply Open it in Designer, and click the “Run” button to see AppRobotic in action!
Detailed Steps
To use the AWS Marketplace, you must have an AWS account. To launch virtual machine instances with AppRobotic from AWS Marketplace, you must be signed up to use the Amazon EC2 service, and you must be subscribed to the AppRobotic software via AWS.
To subscribe, simply click “Continue to Subscribe” on the AppRobotic AWS Marketplace (https://aws.amazon.com/marketplace/pp/B00WZTUCPW) page. The next step is to launch a Windows virtual machine instance on EC2 (Amazon Elastic Compute Cloud) which contains AppRobotic.
You may launch with either 1-Click Launch or Amazon EC2 console. 1-Click Launch helps you launch quickly with recommended default options such as security groups and instance types. If you prefer more options, such as launching in an Amazon Virtual Private Cloud (Amazon VPC) or using Spot Instances, then you should launch using EC2 console.
1-Click Launch
- On the Launch on EC2 page, choose the 1-Click Launch view, and review the default settings. If you want to change any of them, do the following:
- Expand Version, and select the AMI version you want.
- Expand Region, and select the Region you want from the list.
- Expand EC2 Instance Type, and choose an instance type. You will see the pricing information change under Pricing Details to match your selection. You can also review the Monthly Estimate in the right pane.
- Expand Firewall Settings, and choose an existing security group, or choose Click new based on seller settings to accept the default settings. We recommend limiting allowed inbound IP addresses for RDP ports to your organization’s IP range by creating a custom security group and selecting it on the Firewall Settings page.
- Expand Key Pair, and choose an existing key pair if you have one. If you do not have a key pair, you will be prompted to create one. For more information about Amazon EC2 key pairs, see Amazon EC2 Key Pairs.
- When you are satisfied with your settings, choose Accept Terms & Launch with 1-Click.
- On the Launch on EC2 page, choose the Launch with EC2 Console view, and then select the latest AMI version from the Select a Version list.
- Review the Firewall Settings, Installation Instructions, and Release Notes, and then choose Launch with EC2 Console. We recommend limiting allowed inbound IP addresses for RDP ports to your organization’s IP range by creating a custom security group and selecting it on the Firewall Settings page.
- In the EC2 console, you will launch your AMI using the Request Instance Wizard.
Once your virtual machine Instance State shows “running”, you can connect to it with a Remote Desktop Connection program from your computer.
Remote Desktop uses the Remote Desktop Protocol (RDP) and enables you to connect to and use your virtual machine instance in the same way you use a computer sitting in front of you. It is available on most editions of Windows and available for Mac OS.
Prerequisites
- Install an RDP client
- [Windows] Windows includes an RDP client by default. Click on Start and search for “Remote Desktop Connection”. Or, type mstsc at a Command Prompt window. If your computer doesn’t recognize this command, see the Windows home page and search for the download for the Microsoft Remote Desktop app.
- [Mac OS X] Download the Microsoft Remote Desktop app from the Mac App Store.
- [Linux] Use rdesktop.
- IP address: Get the public DNS name of the instance.You can get the public DNS for your instance using the Amazon EC2 console. Check the Public DNS (IPv4) column shown below. If this column is hidden, choose the Show/Hide icon and select Public DNS (IPv4). If you prefer, you can use the describe-instances (AWS CLI) or Get-EC2Instance (AWS Tools for Windows PowerShell) command.
- (IPv6 only) Get the IPv6 address of the instance. If you’ve assigned an IPv6 address to your instance, you can optionally connect to the instance using its IPv6 address instead of a public IPv4 address or public IPv4 DNS hostname. Your local computer must have an IPv6 address and must be configured to use IPv6. You can get the IPv6 address of your instance using the Amazon EC2 console. Check the IPv6 IPs field. If you prefer, you can use the describe-instances (AWS CLI) or Get-EC2Instance (AWS Tools for Windows PowerShell) command. For more information about IPv6, see IPv6 Addresses.
- Locate the private key. Get the fully-qualified path to the location on your computer of the
.pemfile for the key pair that you specified when you launched the instance. For more information about how you created your key pair, see Creating a Key Pair Using Amazon EC2. - Enable inbound RDP traffic from your IP address to your instance. Ensure that the security group associated with your instance allows incoming RDP traffic from your IP address. The default security group does not allow incoming RDP traffic by default. For more information, see Authorizing Inbound Traffic for Your Windows Instances.
Connect to Your Windows Instance
To connect to a Windows instance, you must retrieve the initial administrator password (see step 2 below) and then specify this password when you connect to your instance using Remote Desktop.
The Username of the administrator account depends on the language of the operating system. For example, for English, it’s Administrator, for French it’s Administrateur, and for Portuguese it’s Administrador. For more information, see Localized Names for Administrator Account in Windows in the Microsoft TechNet Wiki.
If you’ve joined your instance to a domain, you can connect to your instance using domain credentials you’ve defined in AWS Directory Service. On the Remote Desktop login screen, instead of using the local computer name and the generated password, use the fully-qualified user name for the administrator (for example, corp.example.com\Admin) and the password for this account.
After your Amazon EC2 instance with AppRobotic is launched and running, follow these instructions to practice connecting to it.
In these instructions, we assume you are running Windows and the Windows Desktop Connection client application. For information on other operating systems, see the Prerequisites section above and Connecting to Your Windows Instance Using RDP.
- Sign in to the AWS Management Console and open the Amazon EC2 console at https://console.aws.amazon.com/ec2/.
- In the navigation pane, under Instances, choose Instances.
- Browse to and choose your running instance in the list.
- Choose Connect.
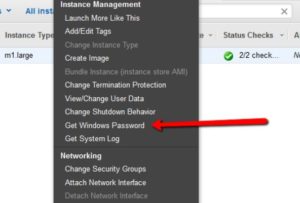
- Right-click on the instance and choose Get Windows Password, and then click Choose File.
- Browse to and choose the Amazon EC2 instance key pair file associated with the Windows Server Amazon EC2 instance, and then choose Open.
- Choose Decrypt Password. Make a note of the password that is displayed (it will take a few minutes after the instance is launched before the password is available). You need it in step 10.
- Choose Download Remote Desktop File, and then open the file.
- Alternatively, you can open the Remote Desktop Connection client app, and enter the Public IP address noted earlier.
- Type the Administrator username described above per your language settings. Type the password you noted in step 7, and then proceed. (If your RDP connection client application prompts you for a user name, type
Administrator.) - After you are connected, the desktop of the Amazon EC2 virtual machine instance running AppRobotic is displayed.
- Double-click the AppRobotic icon on the desktop to launch AppRobotic Designer. There is also a Getting Started script on the desktop, simply Open it in Designer, and click the “Run” button to see AppRobotic in action!
approbotic aws console aws marketplace connect launch instance password rdp remote desktop connection start instance username virtual machine